|
This version is still in development and is not considered stable yet. For the latest stable version, please use StreamX Guides 1.1.0! |
StreamX Command Line Interface (CLI)
The streamx command lets you run a StreamX Mesh locally and ingest it with payloads.
Prerequisites
-
You have installed Java 17 or higher.
The StreamX CLI is built on Java, so you must have it installed. -
You have installed Docker.
The StreamX CLI uses Docker for containerization. Verify you have it installed and running on your system.
|
Docker on Windows requires Windows Subsystem for Linux (WSL). Verify you have virtualization enabled in the BIOS (required by the WSL service). |
-
You have a proper package manager:
-
Homebrew (for Linux/macOS)
-
Scoop (for Windows)
-
Installing the CLI
The StreamX CLI is available in two developer-oriented package managers:
-
Homebrew - for Linux and macOS
-
Scoop - for Windows
These package managers provide the easiest way to install and update StreamX CLI.
Homebrew
Homebrew is a package manager for macOS (and Linux). You can use Homebrew to install (and update) StreamX CLI.
To install the latest version of StreamX CLI by using Homebrew, run the following command:
brew install streamx-dev/tap/streamxThis command can also be used to upgrade StreamX CLI.
Once installed, streamx is in your $PATH.
Running streamx --version prints the installed version:
streamx --version
# streamx-cli version: 1.1.0
You can also upgrade StreamX CLI with:
brew update
brew upgrade streamx
To list the available versions of StreamX CLI, use brew tap streamx-dev/tap && brew search streamx-dev/tap/streamx\*.
You can then install the version of StreamX CLI you want with brew install streamx-dev/tap/streamx@x.y.z.
|
Scoop
Scoop is a package manager for Windows. You can use Scoop to install (and update) StreamX CLI.
To install the latest version of StreamX CLI by using Scoop, run the following commands:
scoop bucket add streamx-dev https://github.com/streamx-dev/scoop-streamx-dev.git
scoop install streamx
Once installed, streamx is in your $PATH.
Running streamx --version prints the installed version:
streamx --version
# streamx-cli version: 1.1.0
You can upgrade StreamX CLI with:
scoop update streamx
The list of the available versions of StreamX CLI is published at releases page.
You can then install the version of StreamX CLI you want with scoop install streamx@x.y.z.
|
Using the CLI
Use --help to display help information:
streamx --help

Usage: streamx [-hV] [[--accept-license]] [COMMAND]
      --accept-license   Automatically accept the current StreamX license
  -h, --help             Show this help message and exit.
  -V, --version          Print version information and exit.
Commands:
  init       Initialize new StreamX project.
  run        Run a StreamX Mesh locally.
  dev        Develop a StreamX Mesh locally.
  publish    Send publication data
  unpublish  Send unpublication data
  batch      Send batch messages from directory
  stream     Send stream of messages from file
  deploy     Deploy the StreamX Project to the cloud.
  undeploy   Undeploy the StreamX Project from the cloud.
  help       Display help information about the specified command.
streamx init
Creating a StreamX project from scratch might be time-consuming.
The streamx init command enables quick initializing StreamX project structure.
It also creates sample services that can be inspiration for developing your own services.
Similarly, a sample configuration of mesh.yaml can be helpful.
By default, the streamx init command initializes a new project in streamx-sample-project directory.
To specify a different output directory, use the following command:
streamx init new-streamx-project
# Initializing StreamX project...
# Project is ready in '<absolutePath>/new-streamx-project'.
For more information, see the source repository - StreamX Sample Project.
streamx init uses the git command. Verify that you have git installed and configured in a command line.
You can check this by running git version which should output the current Git version.
|
streamx run
For development purposes, it is possible to run StreamX Mesh locally.
To do this specify the location of the StreamX Mesh definition.
By default, StreamX CLI looks for mesh.yaml and mesh.yml in the
current directory. If both are present, mesh.yaml is used. You can specify a custom path to the mesh definition by using
the -f option.
streamx run -f ./streamx-mesh.yamlThis outputs information that STREAMX IS READY! with ports exposed by StreamX Mesh’s containers.
streamx run.--------------------------------------------------------------------------------
STREAMX IS READY!
--------------------------------------------------------------------------------
Stack:
pulsar
client-service-url pulsar://localhost:6650
admin-service-url http://localhost:18080
otel-lgtm
grafana http://localhost:3000
otel-collector http://localhost:4317
tempo http://localhost:3200
prometheus http://localhost:9090
DX Mesh:
web-delivery-service http://localhost:8081
relay http://localhost:62329
rest-ingestion http://localhost:8080
--------------------------------------------------------------------------------
Network ID:
dbef5cd015a6637f4bd392de551ba7e2387e63d0eabca71a3d0bd7ee9d12b0d7
Mesh configuration file: ./mesh.yaml
--------------------------------------------------------------------------------
Sources:
websight token: eyJ0eXAiOiJKV1QiLCJhbGciOiJSUzI1NiJ9.eyJpc3M....
root token: eyJ0eXAiOiJKV1QiLCJhbGciOiJSUzI1NiJ9.eyJpc3M....To shut down a running mesh, simply kill the process with ctrl + c.
It also handles stopping containers and cleaning up existing data.
| Shutting down StreamX takes a few seconds. Wait a while to avoid a startup error on restart. |
Startup sequence
The startup sequence for services follows a structured order to ensure proper initialization and operation:
-
Ingestion Service: The Ingestion Service is started first after all base containers (messaging system, initialization, observability) are up and running.
-
Processing Services: After the Ingestion Service is up and running, all Processing Services are started in parallel. The startup order is determined by their sequence in the
mesh.yamlfile. -
Delivery Services & Composite Delivery: Once all Processing Services are active, the Delivery phase begins, following a paired approach: For each service listed in the
mesh.yamlfile, its associated Composite Components are started first. All components for a given service are started in parallel. Once the components become operational, the service itself is activated. This process is repeated sequentially for each entry in themesh.yamlfile.
Observability
StreamX CLI can provide additional services that make it easier to monitor the operation of the mesh once enabled. The main services that facilitate development are:
-
Grafana - enables data querying, visualising and alerting on
-
Tempo - tracing backend enabling workflows monitoring and troubleshooting
-
Prometheus - collects and stores its metrics in the form of time series data
-
Otel-collector - receives, processes and exports telemetry data
| Although all services run in a single container, they do consume resources. They are disabled by default. Refer to Run configuration for more details. |
Container logs
StreamX CLI is based on Docker containers, so container-specific logs are available through the Docker CLI.
docker logs yourStreamXMeshContainerYou can also access logs from any GUI-based application that manages the Docker environment.
Run configuration
| Configuration property | Type | Default |
|---|---|---|
It is also used in the underlying messaging system to set up dedicated channels and topics.
|
String |
streamx |
|
positive natural number |
60 |
|
boolean |
false |
|
String |
${user.home}/.streamx/config/generated |
streamx dev
StreamX CLI also provides a command designed specially for StreamX Mesh development.
The streamx dev command supports the same options as streamx run with additional features such as:
-
Live reloading of the developed mesh. The reload is triggered by modification of the supplied StreamX Mesh definition.
-
Serving the local StreamX Dashboard instance. This service visualizes the state of the local StreamX Mesh.
To select a developed mesh, specify the location of the StreamX Mesh definition.
By default, StreamX CLI looks for mesh.yaml and mesh.yml in the
current directory. If both are present, mesh.yaml is used. You can specify a custom path to the mesh definition by using
the -f option.
After running streamx dev, the StreamX Dashboard is available on localhost at the configured port (default 9088).
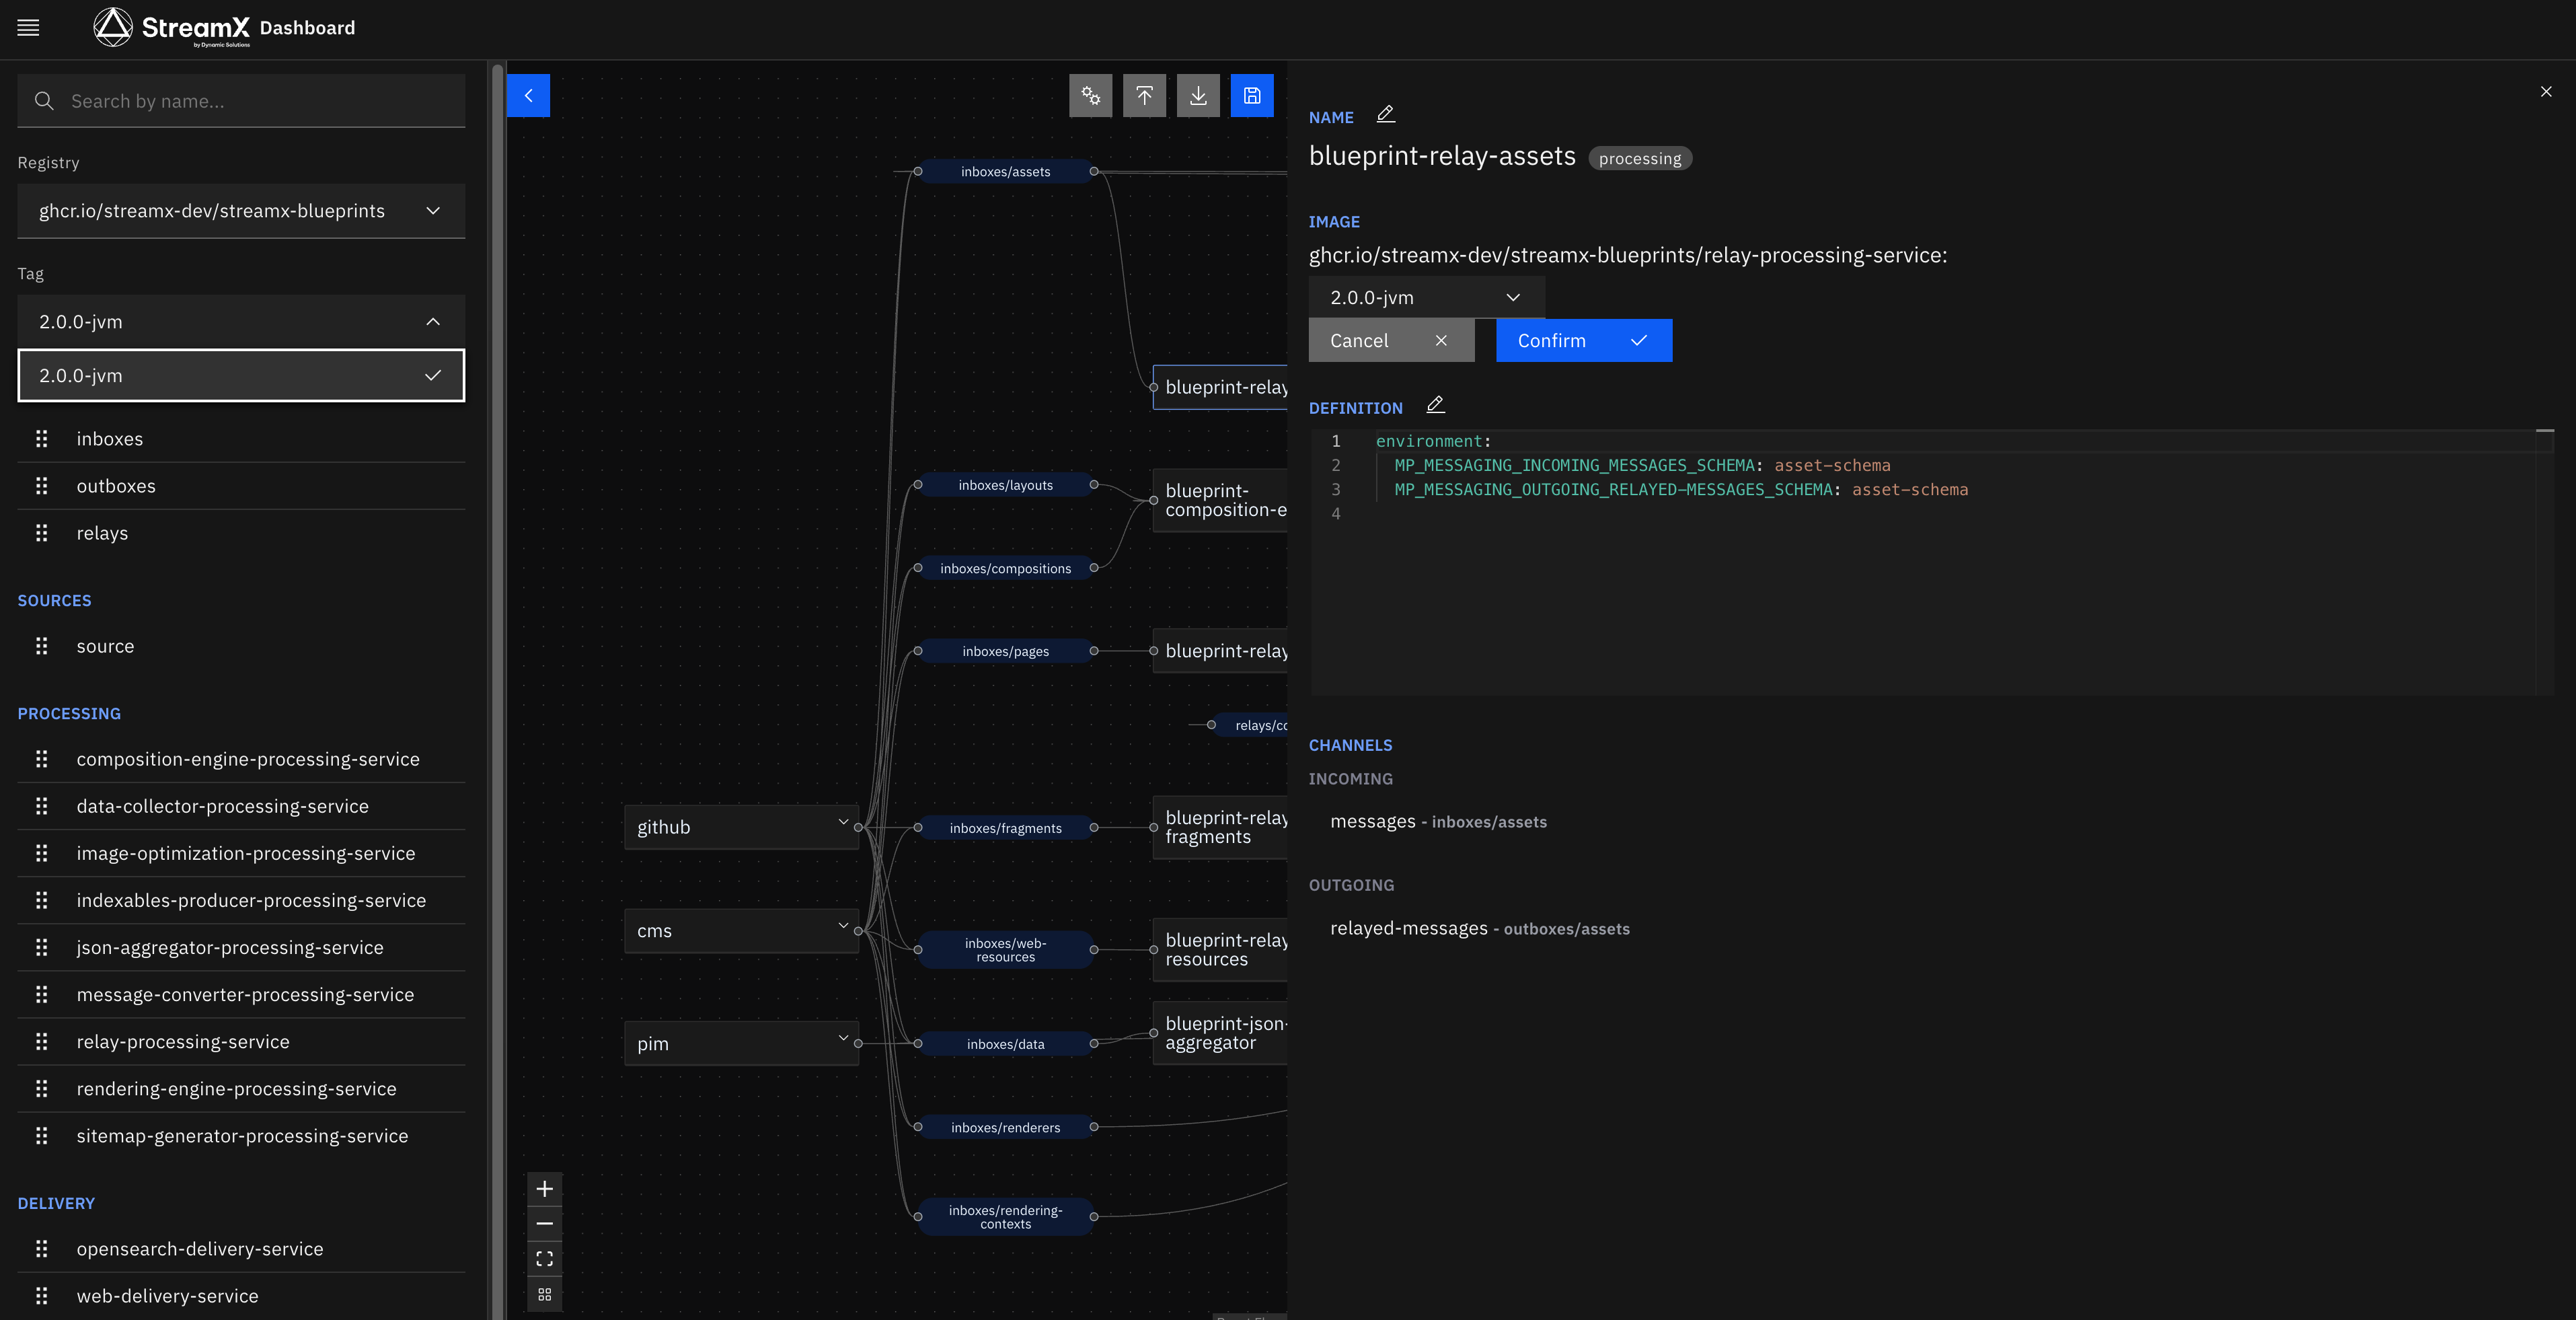
Editing StreamX Mesh definition in StreamX Dashboard
The StreamX Dashboard contains the UI editor for the Mesh definition (mesh.yaml), which validates connections between services and topics.
It also lists available services that can be added to the mesh by using drag and drop.
The Mesh definition does not contain information about the available services.
This data must be stored in the services directory within the Mesh definition directory.
The StreamX Dashboard searches for JSON files with metadata recursively filtering out
files without a streamx-service-metadata directory in the path.
However, the metadata JSON files are searched anywhere in the services directory,
to avoid conflicts the suggested metadata file path is:
services/streamx-service-metadata/<registryName>/<version>/<serviceName>/<version>.json
The StreamX Dashboard also searches for metadata in the services directory in the project root.
This directory contains sources of processing and delivery services developed in the project scope.
Building services causes metadata to be generated, which is by the StreamX Dashboard.
| Metadata is generated when a service is built. If the metadata of a developed service changes, for example if a channel is added, a rebuild is required to update the metadata. To view metadata changes in the UI Editor, reload the UI Editor. |
sample_project
├── mesh
│   ├── mesh.yaml
│   └── services
│       └── streamx-blueprints
│           └── 2.0.0
│               ├── composition-engine-processing-service
│               │   └── 2.0.0-jvm.json
│               ├── data-collector-processing-service
│               │   └── 2.0.0-jvm.json
│               └── image-optimization-processing-service
│                   └── 2.0.0-jvm.json
└── services
    ├── graphql-delivery-service
    │   ├── src
    │   └── target
    │       └── streamx-service-metadata
    │           ├── 0.0.1-SNAPSHOT-jvm.json
    │           └── latest-jvm.json
    └── template-processing-service
        ├── src
        └── target
            └── streamx-service-metadata
                ├── 0.0.1-SNAPSHOT-jvm.json
                └── latest-jvm.json
Available services
There is a set of StreamX Processing and Delivery services provided by the StreamX Team called StreamX Blueprints.
These service images are publicly available on GitHub Packages. The latest Blueprints Mesh configuration setup and the Blueprints services metadata are available at the StreamX Commerce Accelerator. See the Accelerator’s README.md file for more details.
Dev configuration
| Configuration property | Type | Default |
|---|---|---|
|
int |
9088 |
|
boolean |
true |
Ingestion
StreamX CLI allows you to populate the StreamX Mesh with data. The CLI supports both publishing and unpublishing actions.
Ingestion requires providing the ingested channel and the key. This data is sufficient for unpublishing, while publishing requires more data - the content.
You can learn more about ingestion in ingestion reference.
streamx publish
To publish content with StreamX CLI, run the following template command:
streamx publish channel key pathToContentFileFor example, if you want to publish content loaded from the ./content.json file
to the pages channel with the index.html key, you can use:
streamx publish pages index.html ./content.jsonProperties
streamx publish supports sending a payload with metadata properties.
To add a property, specify -p <propertyName>=<propertyValue> for the streamx publish command.
Content-defining options
Publication content is defined in JSON format. It can be defined not only by providing payload file for the third argument, but also by merging content fragments resolved from content-defining options.
There are three content-defining options:
-
-jdefines a raw JSON fragment
The provided JSON fragment will be rewritten to merged JSON without any changes.
This option should be used for raw JSON fragment, along with boolean, number, null or undefined. -
-sdefines a JSON string fragment.
Unlike-jit handles JSON string escaping. Use this option to create string fragment. -
-bdefines fragments containing binary data.
In JSON Avro format (used when communicating with the Rest Ingestion Service), binary data is encoded with string JSON type.
Use this option to create a JSON-encoded binary fragment.
| Option | Name | Use cases |
|---|---|---|
|
JSON fragment |
Full JSON data, boolean, number, null or undefined |
|
JSON string fragment |
string |
|
JSON-encoded binary fragment |
Binary data (for example images, movies, PDF files and others) |
The simplest use of the content-defining option is to create entire JSON content with -j:
streamx publish pages index.html -j "{'content': {'bytes': 'Some string'}}"
The content-defining option, like any command-line option,
requires the use of ' or " to preserve the literal value of the option.
|
The above command might seem unclear.
To improve readability, you can specify a JSONPath expression, which should be replaced with the given value.
streamx publish pages index.html -j content.bytes='"Some string"'When defining a string you still must use ' or ".
When defining a string value you can use -s instead of -j to skip double quotes.
streamx publish pages index.html -s content.bytes='Some string'Ingestion payload source
By default, Content-defining options publish data that is literally specified in the option values.
However, it is possible to publish data loaded from a file.
To do this, add the prefix file:// followed by the path to the content file.
streamx publish pages index.html -s content.bytes=file://relative/path/to/file.jsonThe CLI accepts both relative and absolute paths.
The absolute path always starts with /, so Content-defining options will effectively contain file:///.
|
Multiple Content-defining options
The publish command accepts multiple Content-defining options.
This results in a single JSON that is computed from multiple separate options.
The target content is resolved in four steps:
-
Resolve JSON fragments separately for each Content-defining option
-
Create a temporary JSON with the first fragment
-
For each Content-defining option merge temporary JSON with corresponding fragment resulting in a new temporary JSON
-
After processing all JSON fragments, the temporary JSON becomes the target content
streamx publish pages index.html -j content.num=123 -j {"content":{"text":"text"}}
// published content is {"content":{"text":"text", "num":123}}
Sequential processing of JSON fragments allows you to override JSON nodes derived from previously processed Content-defining options.
streamx publish pages index.html -j content.num=123 -j '{"content":{"num":null}}'
// published content is {"content":{}}
streamx publish channel key pathToContentFile is effectively equal to streamx publish channel key -j file://pathToContentFile
|
streamx unpublish
To trigger the unpublishing of content with StreamX CLI, run the following template command:
streamx unpublish channel keyFor example, if you want to unpublish content fed to the pages channel with the index.html key, you can use:
streamx unpublish pages index.htmlstreamx batch
Individual publishing is time-consuming.
The streamx batch command was created to publish resources efficiently.
To perform batch ingestion of resources placed in the resourcesDirectory directory, run:
streamx batch publish/unpublish resourcesDirectoryThis command has several assumptions:
-
Each file causes a single resource ingestion
-
All files in the same directory are ingested into the same channel
-
Batch configuration is placed in the
.eventsource.yamlfile
Batch ingestion can be recursive - then the child directories follow the rules defined
in the .eventsource.yaml file from the nearest ancestor.
However, each child directory can provide its own configuration by defining .eventsource.yaml.
The .eventsource.yaml configuration file
The .eventsource.yaml file configures the batch ingestion of resources placed in the specified directory.
channel: web-resources (1)
relativePathLevel: 1 (2)
key: /${relativePath} (3)

ignorePatterns: (4)
  - ".*ignore\\.me"

properties: (5)
  "sx:type": web-resource/static

payload: (6)
  content:
bytes: file://${payloadPath} (6)| 1 | channel defines the channel, where all resources will be ingested to.
The channel property is required. |
| 2 | relativePathLevel allows you to specify how many ancestor directories should be used in the ${relativePath}
placeholder, for example for data/images/image.svg file while setting relativePathLevel: 1,
the ${relativePath} will be replaced by images/image.svg |
| 3 | key defines the template of the key that the ingestion message will contain.
It supports placeholders.
The key property is required. |
| 4 | ignorePatterns defines the list of regex filename patterns to be skipped. |
| 5 | properties defines the map of properties that the ingestion message will contain.
It supports placeholders. |
| 6 | payload defines the template of payload that the ingestion message will contain.
It supports placeholders and payload defining substitutions.
The payload property is required. |
Placeholders
Placeholder is a text fragment wrapped into ${} that will be replaced with specific data during batch ingestion execution.
Supported placeholders are:
-
${relativePath}- filename of ingested resource. This placeholder can also contain ancestor directories - therelativePathLevelproperty defines the number ancestors. -
${payloadPath}- filename of the ingested resource. Unlike${relativePath}it does not contain ancestor directories.
Payload defining substitutions
The payload property is template of payload of ingested message.
The value of the payload property is valid JSON.
However, there if any text node of the given JSON template starts with a file:// or json:// prefix that text node will be replaced.
-
The
file://<filePath>injects raw binary content replacing a field value. -
The
json://<filePath>injects the parsed JSON value of this file, replacing a field value.
The <filePath> can contain placeholders.
Full streamx batch example
Let’s assume that we have the following directory structure:
data
├── images
│   ├── .eventsource.yaml
│   ├── image1.png
│   ├── image2.png
│   └── image3.png
└── products
    ├── .eventsource.yaml
    ├── example-product.json
    └── README.md
The .eventsource.yaml files contain the following content:
channel: web-resources
relativePathLevel: 1
key: /${relativePath}
properties:
  "sx:type": web-resource/static

payload:
  content:
bytes: file://${payloadPath}channel: products
relativePathLevel: 0
key: ${relativePath}
ignorePatterns: (4)
- ".*README\\.md"
payload: json://${payloadPath}Calling streamx batch publish data causes the following resources to be published:
Sent data publish message using batch to 'web-resources' with key 'images/image1.png' at <eventTime>
Sent data publish message using batch to 'web-resources' with key 'images/image2.png' at <eventTime>
Sent data publish message using batch to 'web-resources' with key 'images/image3.png' at <eventTime>
Sent data publish message using batch to 'products' with key 'example-product.json' at <eventTime>
streamx stream
Another way to feed StreamX with multiple resources is to use streamx stream.
This allows us to specify a stream source (for example a file) to be sent to a specified channel.
The file containing the stream of messages must have a specific format. Each message must match the rest ingestion payload format (see Ingest data). All messages must be concatenated without any delimiters. However, whitespaces between messages (including new lines) are allowed.
Full streamx stream example
Let’s assume that we have the pages.stream file:
{
  "key" : "index.html",
  "action" : "publish",
  "eventTime" : null,
  "properties" : {
    "sx:type": "page/content"
  },
  "payload" : {
    "dev.streamx.blueprints.data.Page" : {
      "content" : {
        "bytes" : "<h1>Hello World!</h1>"
      }
    }
  }
}
{
  "key" : "homepage.html",
  "action" : "publish",
  "eventTime" : null,
  "properties" : {
    "sx:type": "page/content"
  },
  "payload" : {
    "dev.streamx.blueprints.data.Page" : {
      "content" : {
        "bytes" : "<h1>This is Home Page!</h1>"
      }
    }
  }
}
Calling streamx stream pages pages.stream causes the following resources to be published:
Sent data publish message using stream to 'pages' with key 'index.html' at <eventTime>
Sent data publish message using stream to 'pages' with key 'homepage.html' at <eventTime>
Source systems simulation
StreamX CLI provides the ability to simulate any source system defined in the mesh.yaml file. Each source system is assigned a unique token, which is displayed after running the StreamX Mesh. To mimic a specific source system, apply the token by using the streamx.ingestion.auth-token property.
root is the default token used by StreamX CLI when no authentication token is provided. In this case, no authorization checks are enforced, and the source system is allowed to perform actions on any channel.
|
Tokens are generated automatically with private and public keys. These keys are generated when the run command is executed. If the keys already exist, no new keys are generated, allowing you to use your own keys if desired. The path where the keys are stored can be controlled by setting the streamx.runner.generated-keys.location property.
Ingestion configuration
| Configuration property | Type | Default |
|---|---|---|
|
String |
|
|
String |
|
|
boolean |
false |
Cloud deployment
StreamX CLI enables easy deployment to the StreamX Platform, which is based on Kubernetes.
Cloud deployment requires StreamX Platform with streamx-operator installed.
If you don’t have it installed, you can ask at StreamX Contact us.
|
StreamX CLI to manage clusters uses the cluster connection and namespace settings
from the current context in your kubeconfig file. Ensure that your kubeconfig
is configured correctly and points to the desired cluster and namespace. You
can verify your current context and namespace by running:
kubectl config current-context
kubectl config view --minify | grep namespace
If necessary, switch to the correct context with the following command:
kubectl config use-context <context-name>or use other kubeconfig file by specifying the KUBECONFIG environment variable:
export KUBECONFIG="<path to kubeconfig file>"streamx deploy
The streamx deploy command allows to deploy mesh selected with the -f option.
If additional configuration of mesh resources is required, then it should be placed in a separate file.
If mesh definition file is named mesh.yaml, then additional configuration should be placed in deployment.yaml file.
In other cases, additional configuration should be placed in deployment.<meshDefinitionYaml> file
for example additional resources for simple-mesh.yaml should be specified in the deployment.simple-mesh.yaml.
The command also supports incremental deployment based on the state of the platform.
Placeholders
StreamX configuration source files (such as Mesh YAML and Deployment YAML) can contain placeholders.
The placeholders have the format ${placeholder.name} and are replaced with values provided in the configuration.
StreamX custom resources
Once streamx deploy is launched, the ServiceMesh Custom Resource is deployed.
This resource is read by streamx-operator, which
creates other StreamX specific custom resources with streamx.dev group name
and deploys the entire StreamX Mesh including all resources such as Pods, Services, Secrets, ConfigMaps and others.
Additional resources
By default, only ServiceMesh, Secrets (derived from the secrets directory) and ConfigMaps (derived from the configs directory) are
managed.
If additional resources must be deployed together for example API gateway configuration specific to this mesh,
specify the streamx.kubernetes.resource-directories property.
This will allow you to deploy all resources from the specified directories.
To avoid a situation, where additional resources have been created, but are left dangling after redeploying or mesh removal, specify the types of these resources.
Setting the streamx.kubernetes.controlled-resource-definitions property allows the CLI to remove orphaned resources. (ServiceMesh, Secrets and ConfigMaps are managed by default without additional configuration)
streamx undeploy
The streamx undeploy command allows you to remove mesh resources from a StreamX Platform.
It supports the same properties that streamx deploy command supports.
This means that the removal of additional resources is also supported.
Cloud management configuration
Configuration property |
Type |
Default |
|
String |
|
|
String |
|
|
String |
Configuration
StreamX CLI uses Quarkus Config for configuration resolution, so it reuses the same configuration sources.
There are also two configuration sources specific to StreamX CLI: StreamX Options and StreamX Home.
The StreamX Option config source allows you to set selected properties with CLI options.
For example, passing the --ingestion-url option sets streamx.ingestion.url for CLI command invocation.
The StreamX Home config source allows you to configure a local development environment.
This config source loads properties from the ${user.home}/.streamx/config/application.properties file.
All available configuration sources, starting from source with the highest priority source, are:
-
StreamX Option config source.
Only selected properties are exposed to be CLI options. -
Environment variables.
All available properties can be set by defining an environment variable. However, environment variable property names must follow the conversion rules. -
.envfile in the current working directory.
This config source is specific to each environment, so all properties can be set by using.envfile. Property names follow the same conversion rules that apply to environment variables. -
./config/application.propertiesfile relative to the current working directory.
This config source is intended to be shared. To prevent sharing sensitive data such as auth tokens, not all properties can be set this way. -
StreamX Home config source.
This config source is intended to be global for users. Only selected properties can be set this way. for example automatic license acceptation or disabling self-signed certificates verification.
Troubleshooting
Each invocation of the streamx command persists file detailed logs.
This file is stored in the ${user.home}/.streamx/logs directory.
Each log file contains invocation timestamp.
Container logs of the running StreamX Mesh containers might also be helpful.
Tracing information is available through Grafana, which is part of the StreamX observability.
License
Use of the StreamX CLI requires acceptance of the CLI license.
By default, the CLI prompts the user to accept the license on the first time the streamx command is run.
streamx --version

Distributed under StreamX End-User License Agreement 1.0
https://www.streamx.dev/licenses/eula-v1-0.html

Do you accept the license agreement? [Y/n]
Respond with y to accept the license.
If you want to use streamx in your CI/CD process set the streamx.accept-license property to true.
This will accept the accept license and prevent reading from standard input.
streamx --accept-license --version

Distributed under StreamX End-User License Agreement 1.0
https://www.streamx.dev/licenses/eula-v1-0.html


Do you accept the license agreement? [Y/n]
Y -> "streamx.accept-license" property was set to "true".| Configuration property | Type | Default |
|---|---|---|
|
String |
false |